April 4, 2013

Sitka and Spruce, Seattle

I truly loved my meal at Sitka & Spruce, it was probably one of my favorite meals ever and most certainly my favorite sourdough. A simple Northwest cusine menu with fun, unique ingredients like stinging nettle or pickled fiddleheads - love! Fantastic service and I loved the open kitchen setting. The best seat in the house is at the communal table where you can watch the magic happen.

Make sure to make reservations in advance to not miss out. It's a favorite of locals and visitors!

What we ordered from their March 2013 menu:
  • Sourdough - This is NOT too be missed. I'm still sad that I failed at buying sourdough to bring home. It's available for purchase daily after 2pm, but apparently you have to get there exactly then or else they sell out. The bread is baked at their sister restaurant The Corson Building and it has this really great charred crispy crust with a soft, chewy tangy center. I dream about this sourdough.
  • Raw black cod, creme fraiche, warm potato, pickled fiddleheads - what a creative dish with a lot going on, but worked as a whole. The curliques are the pickled fiddleheads.
  • Gratin of artichokes, cream, wood sorrel & winter mushrooms - earthy, creamy with a bit of crunch. a bit heavy for me on its own but it's good for sharing.
  • Neah bay halibut with Whidbey kamut and stinging nettle - decided on the halibut over lamb, only because I really wanted to try stinging nettle. it worked out because I don't think i could have had the room for the lamb (though that was the host's reco)
  • Chinon, Les Pensees de Pallus 2010 - French Loire Valley wine that was similar to a very well structured cabernet franc, green bell peppery, herbaceous and held up well to our fish dishes
  • Gateau basque with poached figs - creamy custard center. get it even if you're full.
Can't wait to return, especially for the bread. Oh, and even better - they do seasonal menus so I'm sure there'll be something different next time!

See the full picture gallery here: http://on.fb.me/11tadWC
Neah bay halibut with Whidbey kamut and stinging nettle from Sitka & Spruce


April 3, 2013

Pike's Place Chowder, Seattle

The line wasn't too bad but it was sort of difficult to find. Pike's Place Chowder is located in the building of Pike's Place Market at the corner of pike and 1st, off of Post Alley. Don't give up! It does exist, just have to navigate through the building.

Check in on yelp to get 3 samplers for $8, which comes with sourdough and free crackers.
I got...

Original New England Clam Chowder - this is the famous one, it is really really good.
Seafood Bisque - lots of chewy bits but good
Smoked salmon - didn't really like this one, overwhelmingly like smoked salmon (which I like, but this was too much)

Next time, will try the manhattan!


March 4, 2013

Lowfat Apple Banana Cherry (ABC) Mini Muffins Recipe

I've always loved applesauce banana bread but recently received a 4lb bag of dried cherries and have been trying to figure out how to go through them all (I also made homemade rum cherry ice cream).

Lucky me, I just happened to have 2 leftover ripe bananas and my snack standby -unsweetened applesauce. That's about all you need to make this easy, no-guilt muffin recipe with applesauce, bananas, and dried cherries. There's no butter and no oil in the recipe, with the only fat coming from the eggs. I added a touch of nonfat Fage greek yogurt to add a touch of richness - but that's healthy too!

I guess I could have made full sized muffins, but the mini ones are so much cuter and easier to share. Hope you enjoy these reduced fat ABC mini muffins (applesauce, bananas, & cherries) - they're a healthy snack!

Applesauce Banana Cherry Muffins that are mini and easy to share
Lowfat Apple Banana Cherry Mini Muffins: bananas, applesauce, dried cherries, nonfat greek yogurt, eggs, brown sugar, flour, cinnamon, nutmeg


Lowfat ABC (Apple Banana Cherry) Mini Muffins
Yields: 48 mini muffins (2 pans) or 12 regular sized muffins

Ingredients
  • Dry
    • 1 3/4 cup (219 g) all-purpose flour
    • 1/3 cup (67 g) brown sugar
    • 1 tsp baking powder
    • 1/2 tsp baking soda
    • 1/2 tsp saigon cinnamon (or regular)
    • 1/2 tsp nutmeg, freshly grated
    • 1/2 tsp salt
  • Wet
    • 2 eggs
    • 2 ripe bananas mashed (a little less than a cup)
    • 2 tbsp nonfat Fage greek yogurt (or your brand of choice)
    • 1/2 cup unsweetened applesauce
    • 1/2 tsp vanilla
  • Stir In
    • 1 cup dried cherries (can substitute other dried fruits like cranberries, blueberries, etc. I add a lot because I like the chew but feel free to reduce)
    • (Optional - 1/2 cup nuts of your choice)
Directions
  1. Preheat oven to 350 degrees F
  2. Combine the dry ingredients in a bowl and mix well.
  3. Combine the wet ingredients in a bowl and mix well. Add in mixed dry ingredients and mix together well. 
  4. Stir in dried cherries
  5. Spray mini-muffin tins with non-stick baking spray with flour
  6. Pour batter into muffin tin - about a tbsp each so that batter comes just under the edge
  7. Bake for about 16-18 minutes, until toothpick inserted is clean.
Note: These muffins can be frozen and defrosted, just like your favorite banana bread recipe.


March 2, 2013

The Best Breakfast Egg Casserole - Texas Eggs Recipe

Texas Eggs are a Thanksgiving tradition in our household passed down over the years. You make it the night before, and bake it the morning of Thanksgiving for a fuss free, filling breakfast that keeps the kitchen clean for Thanksgiving cooking. Another bonus is that it gets the oven warm and prepped!

Now, this 16 egg casserole recipe may look like a heart attack on a plate, but having this once a year is so worth it. Just invite more people over to help feast on the rich, savory, creamy goodness of the egg casserole. But don't forget - the reheated leftovers are EVEN BETTER so don't worry if there aren't many to enjoy together.

Texas Eggs Recipe 
Ingredients
¼ cup butter
½ cup flour
1 qt whole milk
3 oz dried beef*, diced
½ lb bacon, fried & crumbled (make sure this is crispy)

16 eggs
½ tsp salt
1 c evaporated milk
¼ c butter

Sprinkle of paprika

Directions - Day 1
  • Cook the butter, flour and whole milk until thick. It should be thick enough to coat a spoon and it will look sort of like gravy.
  • Add the dried beef & bacon and set aside

  • Whip together the eggs, salt & evaporated milk.
  • Melt the butter in a large frying pan, add the egg mixture and scramble eggs until they just start to set.

  • Butter a 9x13 pyrex pan and layer as follows:
    • First a thin layer of sauce
    • Next all the eggs
    • Top with the rest of the sauce
    • Sprinkle with paprika
  • Cover and refrigerate overnight

Directions - Day 2
  • Bake 275°F 1 hour – let stand at least 5 min before cutting

*Dried beef can be found in the grocery aisle usually near the canned goods like canned tuna in regular grocery stores (eg Safeway, Walmart, Lucky, etc. NOT organic places like Whole Foods) The brand that is usually available is Hormel's, or you can order it online. There is no substitute so make sure you find it!


January 23, 2013

My Perfect Macaroni and Cheese Recipe

Martha Stewart's "Perfect Macaroni and Cheese" was pretty close to perfect, but I've made a couple tiny tweaks to make it perfect for me and the family. By using Panko instead of her "buttered breadcrumbs", I save oven space (for all those other Thanksgiving dishes) and I get more of the cheesy crunch across the top (love!). By using a tbsp more butter but 2% milk - it helps keep this mac 'n cheese rich and gooey, but not as heavy which is the only fat sacrifice made for this dish.

Hope you enjoy this as much as we did! We lamented at the lack of leftovers :(


Image of Mac 'n Cheese out of the oven
Perfect Macaroni and Cheese: macaroni, butter, flour, 2% milk, gruyere, sharp white cheddar, parmesan, panko, parsley, etc.

Perfect Macaroni and Cheese
Adapted from Martha Stewart's Recipe, Volume 66 February 1999

You can easily double this recipe; use a 3 quart casserole dish if you do.
Serves 6

4 tablespoons (1/2 stick) unsalted butter, plus more for dish
2 3/4 cups 2% milk
1/4 cup all-purpose flour
1 teaspoon kosher salt (or more to taste)
⅛ teaspoon freshly grated nutmeg
¼ teaspoon freshly ground black pepper
(or more to taste)
⅛ teaspoon cayenne pepper
2 ¼ cups (about 9 ounces) grated sharp white cheddar
1 cup (about 4 ounces) grated Gruyere
½ pound elbow macaroni
½ cup grated Parmigiano Reggiano
¾ cup Panko breadcrumbs
2 tbsp freshly chopped parsley

  • Heat the oven to 375 degrees. Butter a 1.5-quart casserole dish; set aside. Combine panko, parsley, and parmesan in a small dish; set aside. In a medium saucepan set over medium heat, heat milk until steaming but not boiling. Melt 3 tablespoons butter in a high-sided skillet over medium heat. When butter bubbles, add flour. Whisk with a flat whisk until smooth, 1 minute.
  • Slowly pour hot milk into flour-butter mixture while whisking. Continue cooking, whisking constantly, until the mixture bubbles and becomes thick (coats a spoon).
  • Remove the pan from the heat. Stir in salt, nutmeg, black pepper, cayenne pepper, 1.5 cups cheddar, and 3/4 cup Gruyere. Season with salt to taste. Set cheese sauce aside.
  • Fill a large saucepan with water. Bring to a boil. Salt water. Add macaroni; cook 2 to 3 fewer minutes than manufacturer's directions, until outside of pasta is cooked and inside is underdone (not crunchy though). Transfer the macaroni to a colander, rinse under cold running water, and drain well. Stir macaroni into the reserved cheese sauce.
  • Pour the mixture into the prepared casserole dish. Sprinkle remaining 3/4 cup cheddar and 1/4 cup Gruyere; sprinkle panko mixture on top. Dab remaining butter in spots on top. Bake until browned on top and bubbly on the edges, about 30 minutes. If the top isn’t crispy enough, broil for a few minutes but watch carefully. Transfer dish to a wire rack to cool for 5 minutes; serve.


September 8, 2012

The Salt Lick for "Bottomless" Brisket BBQ and More!


The Salt Lick is one of the best barbecue places to visit if you're near Austin, TX. It's located in Driftwood, TX which is about a 35 minutes outside of Austin, but between the amazing bbq and experience - it's worth the drive. They are always busy though, so my reco would be to go at an off hour. We went at around 4:30PM on a Sunday afternoon, and were seated right away. During normal meal hours, the waits can easily get up to over an hour.

If it's your first time, I strongly recommend ordering the all you can eat "Family Style" option for $19.95 as this is the best way to get to try the different meat options: beef brisket (lean, moist, burnt ends), sausage, and pork ribs. It also comes with potato salad, cole slaw, baked beans, pickles, white bread, and optional jalapenos (careful - these are really spicy!). Don't discount the white bread - it's probably the softest, tenderest white, sandwich bread I've ever had. A hint of sweetness with texture that's probably most similar to Hawaiian bread. Add some whipped spread and enjoy :)

Get everything for your first plate just to see what you like. I normally like either lean or burnt ends, but found out after trying the options that "moist" for the brisket was my favorite. You get enough of the "char" and a little bit of crispy on the edges, without it being too tough (which the burnt ends ended up being). The moist beef brisket is so, so tasty! My 2nd favorite is the sausage, and last - the pork ribs. I've definitely had better pork ribs (I really like Texas Roadhouse), but the beef brisket and sausage are amazing. 

All the barbecue has 'sauce' already, but you can add more. They have their original and spicy available at the tables. While they call the spicy "Habanero", it really is not very spicy at all. I liked the original and don't think the extra spice added anything unique. The sauce here isn't tomato based and tastes really unique from other bbq sauces I've had. It's very yummy though and you can buy bottles of it to bring home.

The potato salad and cole slaw (neither of which have mayonnaise based sauces which I appreciate) both have a light vinegar taste. Along with the pickles, these work great with the bbq as it helps cut through the grease. They may not be the most attractive sides, but they are simple and good. I'm not a huge baked beans fan - but they're worth trying.

Last, I've heard their desserts - cobblers and pies - are delicious, but I had too much meat in my belly :( Maybe next time. I haven't tried the turkey either so I just might do that. Mmmm….can't wait till I get more brisket. The Salt Lick is worth visiting again and again, but I may have to sacrifice a visit the next time I'm in Austin to try 

Tips: The Salt Lick is BYOB and if you're really craving a fix, they do have a location at the airport. It's not as good - but it does the trick to get your last bite of barbecue in!

See more pictures here: http://on.fb.me/PcCICN

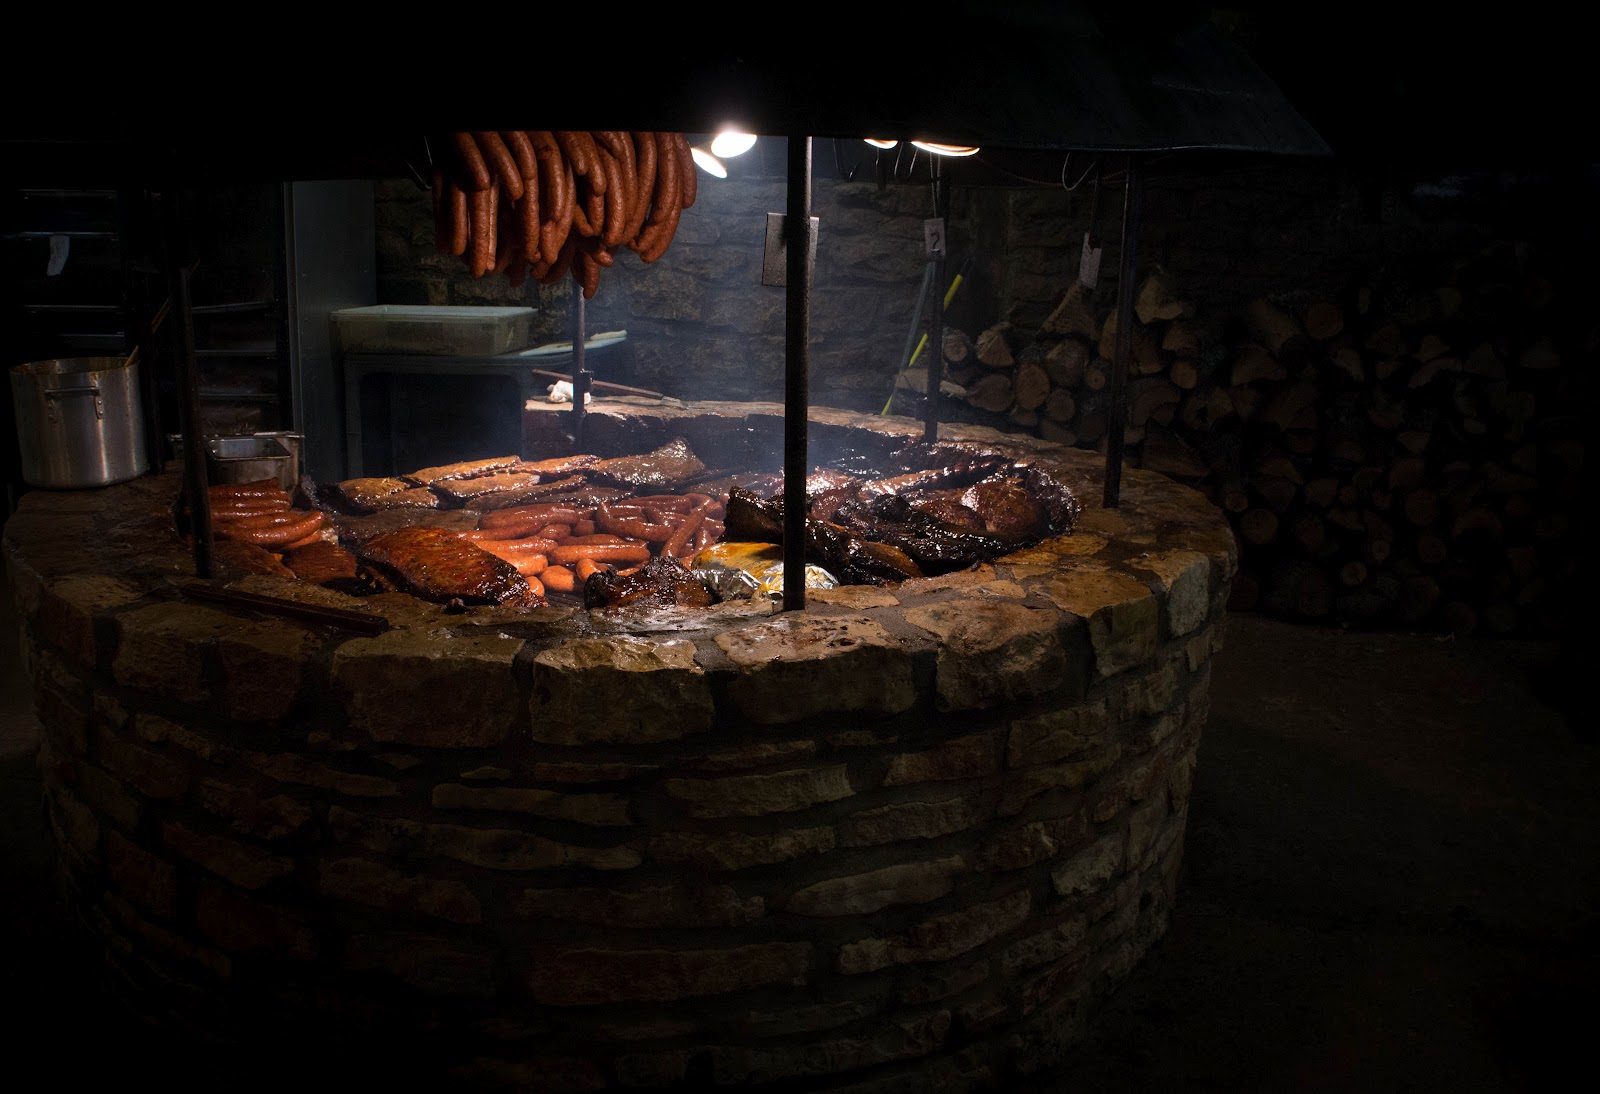
The BBQ Pit, A Smorgasbord!
The barbeque pit at the Salt Lick: sausage, turkey, brisket, ribs, and more
All You Can Eat "Family Style" - $19.95
Salt Lick Family Style Food
"Family Style": endless sausage, ribs, brisket, potatoes, cole slaw, beans, bread and pickles


August 6, 2012

Low (er) Fat, Tender Buttermilk Biscuits Recipe

I won't pretend that these biscuits are without fat, but given that they are made with 1% buttermilk, it makes me feel better that they are "low fat" biscuits :) More importantly, others won't be able to tell that they are "healthier", and an added bonus is that they are very easy to make! 

Adapted primarily from a highly rated Cooking Light biscuit recipe, I added additional best practices from other biscuit experts that I incorporated. I learned that making good biscuits is all in the handling of the dough, so hopefully these tips will help you avoid dry and crumbly biscuits.

Tip: While these are very easy to consume, I highly recommend eating these in moderation as your belly will get full from them! My friends and I love these and hope you do too :)

Lowfat Buttermilk Biscuits Recipe
Makes approximately 12 2-inch biscuits
(recipe easily doubles to make ~12 3.5" biscuits)

  • 9 oz all-purpose flour (I highly recommend weighing this as extra flour makes for dry biscuits!)
  • 2 1/2 tsp baking powder
  • 1/2 tsp salt
  • 3 tbsp chilled butter, cut into small pieces
  • 2 tbsp chilled shortening, cut into small pieces (I use Crisco)
  • 3/4 cup 1% buttermilk (make sure you shake before measuring)
  • 3 tbsp honey
PREPARATION
  1. Preheat oven to 400 degrees (425 if you are making 3.5" biscuits)
  2. Prepare butter & shortening into small pieces and refrigerate to ensure they are chilled.  (Note: you can use all butter or all shortening but I like the combination of both. The shortening creates a flakier biscuit)
  3. Combine flour, baking powder, and salt in a large bowl.
MIXING
  1. Cut in butter & shortening until mixture resembles coarse meal. It's ok if there are a little pebbles of fat left. Chill for at least 10 minutes.
  2. Whisk buttermilk and honey until well blended (Note: I do this in a 2-cup Pyrex so it's easy to measure and pour), then place in the fridge to chill as well.
  3. After ingredients are chilled, create a crater in the middle of the flour mixture and pour the liquid mixture all at once into the crater.
  4. Use a fork to mix everything together as quickly as possible, starting from the center and bringing flour in, until just moist. It's ok if there's a little flour left, but you don't want a lot.
FOLDING & CUTTING
  1. The next few steps are critical. Do not overwork the dough or else you'll get less tender biscuits. I also think this folding method from Cooking Light is the easiest to follow.
  2. Turn dough out onto a lightly floured surface and knead a few times to make sure any extra flour is incorporated.
  3. Pat dough with your fingertips into a 1/2" thick 9x5" rectangle (18x10" if you're making larger biscuits). Dust surface lightly with flour.
  4. Fold dough into thirds, as if folding a piece of paper to fit an envelope.
  5. Pat dough again into 1/2" thick 9x5" rectangle (18x10" for larger biscuits). Dust surface lightly with flour.
  6. Fold dough into thirds.
  7. Pat dough to a 3/4" thickness into a shape where you can maximize the number of biscuits, depending on your biscuit cutter size. 
  8. Cut dough with your preferred biscuit cutter. Make sure to press straight down, and do NOT twist the cutter. You can also cut your dough into squares if you prefer.
BAKING
  1. Place dough rounds on a parchment lined baking sheet with the edges just touching. This helps the biscuits to rise and also helps them to stay more tender. (Note: you can reshape the scraps and bake, but these won't be as tender)
  2. Bake for approximately 12 minutes on the top oven rack. For larger biscuits, rotate pan about halfway through. The biscuits should be cooked after ~12 minutes, but check a scrap to be sure. If the biscuits are cooked inside but not quite golden on top yet, use the broiler for 1-2 minutes (while watching carefully!) to create the color.
  3. Remove from pan and cool 2 minutes on wire racks before serving.
These biscuits are really best on the same day, but are still pretty tasty the next if you store them in a ziplock bag. I have also freezed them after bake for future consumption. Enjoy alone, with jam, or get creative! I served these with a homemade Korean-inspired fried chicken slider.

Homemade Lowfat Buttermilk Biscuits
Homemade Biscuits
Lowfat Buttermilk Biscuits: all-purpose flour, 1% buttermilk, butter, crisco, baking powder, salt, honey

East Meets West Fried Chicken Slider on a Biscuit
East Meets West Fried Chicken Slider: fried chicken, homemade Korean inspired  bbq sauce, homemade pickles & fresh lettuce on a biscuit