July 15, 2012

Dim Sum in SF Bay Area: Koi Palace, Daly City

om nom notes rating: 4 stars

Dim Sum on the weekends can hit the spot - but only if you're mentally prepared for the wait (easily 30-90 min) and ok service. Koi Palace at the Daly City is a good option in the Bay Area, but it is a little more pricey and there will always be a wait. They do have the traditional dim sum carts, but that's also supplemented by a menu where you can order off on for any particular dishes you may want to try - without constantly having to "check" if the next server has it in her cart.

Koi Palace has an extensive menu, and they do use quality ingredients generously (eg the har gow with a lot of plump shrimp). As long as you expect the wait and know that you're not going for the service (despite the price), you'll enjoy the food and experience. Note: in comparison to other dim sum locations, the service here is actually quite good!

Tips for Dim Sum at Koi Palace:
  1. Get there early - your wait will be much less the closer you arrive to their opening time for dim sum on the weekend, 10am on Saturdays and 9am on Sundays. Get your number and wait outside where it's quieter - they have a speaker outside so you can hear your number. Koi has a clever "number tracking" screen where you can see exactly how many tables are in front of you, sorted by table size. They even have an SMS update notification you can sign up for. Note: While you can *try* making a reservation, you will most likely still have to wait.

    Dim Sum Hours: Sat 10-3, Sun 9-3 (or weekdays from 11-2:30)

  2. Because you're waiting - you might as well try out the Dragon's Beard Candy, a hard to find, traditional Chinese confection. The skill to make this sweet treat is very rare so take advantage of the opportunity! I literally haven't had this in over 10+ years and am so glad Koi Palace always has it. See it made: http://on.fb.me/N9JN7A

  3. Order the roasted suckling pig slices - this is one of the "special" items off the menu. It's a little pricey at $18 an order but it's worth it. Get it if you love crispy pork skin and tender, juicy pork. You'll want to order this from the servers as it often does not show up in the carts.

  4. Baked egg custard buns take 45 min to prepare - so order these from the servers as soon as you sit down in case they have run out of a batch. These are usually my favorite, but I unfortunately did not get to try them as I wasted all my time waiting for these to appear in the carts :(

  5. Use the carts & order off the menu - i hate it when dim sum places only have the "order off the menu" option as it no longer feels like dim sum any longer. Koi has a nice variety of options from the carts, but because of how busy the place is - sometimes there are selections that never come by you. This is where the menu comes in handy.
    You can easily flag down a server to order any specific dishes that you don't want to miss, and they'll bring it back to you. This way, you get the experience & ensure you don't miss out!

  6. Don't forget to order tea - It's not dim sum unless you have tea. My favorites are either Puerh or Chrysanthemum to go with dim sum. Oolong (which I normally love) in my opinion gets a little overpowering.
See more pictures @ http://on.fb.me/Nrbl3S

Hand Roasted Suckling Pig Slices - $18
Order the Suckling Pig for $18 - it's worth it.
Roasted Suckling Pig Slices: the skin is so crispy but the inside stays nice and moist
Fresh Dragon's Beard Candy - $9 for 8 pieces
Assembling Dragon's Beard Candy with the Original filling
Dragon's Beard Candy: a traditional chinese confection made from spun sugar, and filled with toasted peanut, coconut, and sesame. Koi Palace has someone to make it fresh, don't miss out - it's hard to find!
3.5 star rating
1564 Yelp reviews as of 7/15/12

(650) 992-9000


July 13, 2012

A Must Try Food Truck: Turf N Surf Po' Boy in Austin


om nom notes rating: 5 stars

This food truck served what ended up being my favorite meal in Austin, TX this last trip. In a sea of food trucks - Turf N Surf Po' Boy stands out from the rest because of it's unique local, fresh food menu and intentionally dilapidated but charming "truck". They had quite the selection of responsibly sourced seafood, beef, pork and veggies - but po' boys are truly the star. This truck is not to be missed.

I have to add that the folks here are the NICEST people. They took the time to recommend selections, and made it a point to tell me that I could order anything exactly the way I wanted. So of course I did. :) They were also very apologetic when they didn't have some menu items like the guacamole or etouffee.

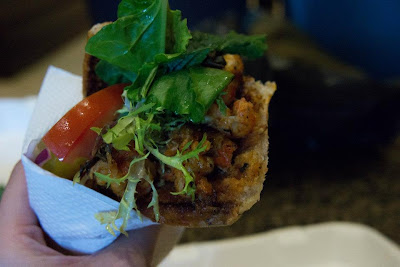
While their blackened or fried shrimp po boys are the crowd favorite, I chose to do the grilled crawfish po-boy with extra tomatoes and coleslaw on the side. 

It was AMAZING. Between the crusty and just right grilled multi-grain bread (different from your standard french-style baguette), the seasoned just right crawfish, the fresh tomatoes & mesclun greens, and the addition of thick sliced pickles - every bite's mingle of flavors made me so happy. 

While you would think might be a heavy, greasy sandwich - the greens, pickles, and squeeze of line added the unexpected freshness that made this monstrosity of a sandwich seem almost delicate. It was so good that I must have eaten the entire thing in 5 minutes. The coleslaw is very creamy (courtesy of Mr. Mayo), so I'm glad I got it on the side. 

You can also get any of the Po' Boys in the form of 2 tacos, or a salad (but really - who would want to do that?). I got to try a bit of the blackened shrimp taco, but I have to say that the po-boy with the amazing bread is better and significantly more memorable. Blackened shrimp was very good though.

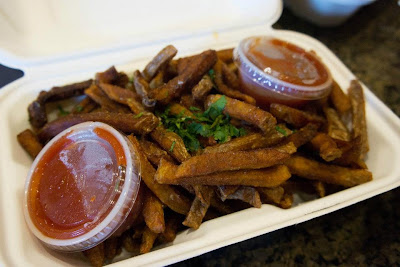
The cilantro fries on their own are worth getting, just note that it's a huge portion and enough to share between at least 4 people. Curiously enough, they reminded me of the fries from "The O" (The Original Hot Dog Shop) in Pittsburgh - about a medium cut, but fried till crispy.  I had heard that you can get etouffee fries, but sadly they were out of gravy. Next time…

See more pictures at: http://on.fb.me/NIkzeh

Quick Notes:
  1. Love that the truck/trailer was built out of 90% recycled/reclaimed material - it started as a shipping container!
  2. There is a shaded seating area, but it's open so still hot!
  3. They take credit cards.
  4. Learn more about the history of the po' boy.
  5. They sometimes are open outside of their normal hours, just check their Facebook page for updates
    • Normal Hours:
      Mon-Thu 11 am - 3 pm
      Fri 11 am - 3 am
      Sat 12 pm - 3 am
Grilled Crawfish Po' Boy - $10
Grilled Crawfish Sandwich from Turf N Surf
Grilled Crawfish Po' Boy: grilled crawfish, mesclun greens, pickles, red onion, tomatoes, and coleslaw (on the side)


Cilantro Fries - $3
Potato Fries Large Enough to Share
Cilantro Fries: fresh cut potatoes, salt, cilantro, ketchup


Turf N Surf Po' Boy Trailer Truck
People waiting in line for food from Turf N Surf
Turf N Surf Po Boy Food Truck: at 4th and Congress
Turf N' Surf Po Boy
4.5 star rating
177 Yelp reviews as of 7/13/12

July 5, 2012

Bagels that are Worth the Calories

om nom notes rating: 5 stars


Ever since I found out that bagels are easily 300-400 calories for a bagel itself, I generally stopped eating bagels. However, I recently discovered House of Bagels in San Carlos. These traditional New York style bagels are amazing and I have to use my utmost control to limit my intake to only 1 bagel per week. These bagels are worth it.


House of Bagels is a franchise in the SF Bay area, but every store controls their own menu. What is consistent is how they make their bagels. Made fresh daily, HOB bagels are boiled first, and then baked on brick. This creates the soft, moist but chewy interior, and a tougher, flavorful crust exterior - just the way a bagel should be. The right texture for both the inside and outside of these bagels is what makes the difference. Note: these bagels aren't as large as Panera or Noah's/Einstein Bro's, but more than make up for it in taste and quality.


While I can easily eat any of these bagels on their own, they taste even better with HOB's large selection of schmears (in between normal and whipped and usually available in lite) or bagel sandwiches (available with your preferred bagel). My favorite bagel go-tos are either egg or jalapeno which I get with lite cream cheese on the side. Or, if I'm feeling particularly indulgent, I go for the "Hamlet" bagel omelet (#3) on jalapeno. Ham, fluffy egg, and american cheese on a bagel with a little bit of kick, it's the best way to start a weekend.


This family owned franchise store cranks out an amazing number of orders every day (including perfecting a method to cook the egg exactly as needed for the bagel breakfast sandwiches!). They're incredibly efficient to help meet the needs of the customers who just want to stop in, pick up, and get on with their day. Don't take this efficiency as poor service please. They work hard and are totally pleasant if you are!


Tip: They only make specific quantities of bagels each day and will close early (before 2pm) if they totally run out! I usually go around 10am on a weekend and have all my choices still. 


See more pictures at http://on.fb.me/PlX3r5


Hamlet Bagel Omelet - $3.85
Hamlet Bagel Sandwich from House of Bagels
Hamlet: jalapeno bagel, ham, egg & cheese
Bagel Varieties - $0.95/each or $9.25/dozen, Premium $1.10/each
Bagels & Premium Bagels from House of Bagels
Bagels: chocolate chip, cranberry, cinnamon raisin, blueberry, garlic, egg, jalapeno, sourdough, pumpernickel, whole wheat, sun dried tomato, salt, rye, onion, all in one, poppy, sesame, plain
Premium Bagels: cinnamon sugar, cheddar & jack cheese, jalapeno cheddar & jack, asiago


House of Bagels - San Carlos

4.5 star rating
60 yelp reviews as of 7/5/12


http://

July 4, 2012

German Chocolate Cake Without Nuts and Ganache Frosting

This is how I like my German Chocolate Cake - no nuts, and frosted with chocolate ganache.  After doing some research, this recipe is mostly based on the version from Joy of Cooking, but with my own little tweaks. Of course, if you like nuts in your german chocolate cake - you can definitely add the pecans back in! 

I also learned that German Chocolate Cake isn't technically from the Germans, it was just a type of sweet chocolate invented by a man named German. :) I think the cake is sweet enough though so my choice was to use dark chocolate (about 58% cacao) instead. Trader Joe's sells their Pound Plus (17.6 oz) Belgian baking chocolate for $4.99 and it works great!

This recipe may look long, but it's worth it! I tried to break out the steps as much as possible for this one :) I hope you enjoy!
No Nut German Chocolate Cake with Coconut Filling
German Chocolate Cake: dark chocolate, butter, cake flour, sugar, eggs, vanilla, buttermilk, salt, coffee, evaporated milk, sweetened coconut, heavy cream, baking soda
German Chocolate Cake Recipe
2 9-inch round layers
  • Group A
    • 2 1/4 cups sifted cake flour (make sure you measure after you sift)
    • 1 tsp baking soda
    • 1/2 tsp salt
  • Group B
    • 4 oz dark baking chocolate, finely chopped
    • 1/2 cup warm coffee (I use strong french-pressed coffee)
    • 1 tsp vanilla
  • Group C
    • 1 cup buttermilk (I used reduced-fat buttermilk and think it's just as good, but you can use regular)
    • 1 cup (2 sticks) unsalted butter (I start with cold butter from the fridge)
    • 1 3/4 cups (350 grams) sugar 
    • 4 large egg yolks (save the egg whites, you'll use them later)
  • Group D
    • 4 large egg whites
    • 1/4 tsp cream of tartar
    • 1/4 cup (50 grams) sugar
  1. PREPARATION
    • Preheat the oven to 355, you'll reduce this to 350 to bake at as soon as you put the pans in. The extra 5 degrees helps to ensure your cake starts baking from the start at 350.
    • Have all the ingredients at room temperature, with the exception of butter if you're using a stand mixer. I've found that this helps to ensure the butter doesn't break.
    • Grease and flour 2 9x2inch round cake pans, or line the bottoms with parchment paper. I don't recommend lining the sides with parchment as these can cause the cake to bake unevenly.
    • If you use parchment, save the scraps to use while frosting later.
       
  2. GROUP A: DRY INGREDIENTS
    • Whisk together sifted cake flour, baking soda and salt until thoroughly blended
       
  3. GROUP B: MELTING THE CHOCOLATE
    • Bring a small saucepan of water to a simmer.
    • Combine chopped chocolate and coffee in a heatproof bowl that will fit on top of your saucepan.
    • Place the bowl on the saucepan and stir until the chocolate is melted and smooth.
    • Stir in vanilla
    • Remove bowl from saucepan and set aside
       
  4. GROUP C: MAKING THE BATTER
    • Have buttermilk measured and ready to go on the side
    • Cut cold butter into 1 inch chunks.
    • Using a stand mixer with a flat beater, beat butter until creamy and pale.
    • On high speed, gradually add 1 3/4 cup sugar (about 1/4 cup at a time) and beat until light and fluffy.
    • Beat in 1 egg yolk at a time until all 4 are incorporated.
    • On low speed, add in the melted chocolate mixture and beat until just incorporated.
    • Add flour mixture in 3 parts, alternating with the buttermilk in 2 parts
    • Beat until smooth and make sure to scrape the sides down as appropriate.
    • Transfer all of the mixture into a large, wide bowl. You'll use this to fold the meringue in later.
       
  5. GROUP D: MERINGUE
    • Use a clean mixer bowl with a flat beater, beat egg whites and cream of tartar on medium speed until soft peaks form.
    • Gradually add 1/4 cup sugar and beat on high speed.
    • Beat until peaks are stiff but not dry.
       
  6. C+D: FINISHING THE BATTER
    • Use a rubber spatula to fold in 1/4 of the meringue into the chocolate batter mix.
    • Fold in remaining meringue.
       
  7. BAKING
    • Divide batter among pans and spread evenly across the tops. I generally measure both pans on a scale to ensure they are equal.
    • Bake until toothpick inserted into the center comes out clean, about 25-30 minutes
    • Let cool in pan for at least 10 minutes before removing from pan.
       
  8. COOLING
    • Lightly spray cooling rack with baking spray.
    • Run a thin knife around edge of pan, invert on to a cooling rack, peel off parchment paper, and turn the cake right side up to cool.
    • Wait till cakes completely cool before frosting.
       
  9. ASSEMBLING THE CAKE
    • Start this process only after cakes and filling have cooled.
    • Cut each cake into 2 halves, using a rimless baking sheet or flexible cutting board (reserved for baking only) to help remove the layers.
    • Split filling into 3 batches (I measure this on a scale to make sure it's even)
    • Starting with the 1st layer on a 10 inch cake round, use the 1st batch of filling and spread evenly across the cake. Leave about a 1/3 inch edge as the filling will push out when you add on the additional layers. 
    • Repeat with next 2 layers of cake. Place the 4th cake layer on top.
    • Trim the edge of the cake with any uneven edges. Doesn't have to be perfect as the edges will get covered with ganache later.
       
  10. FROSTING THE CAKE
    • Place your parchment pieces around the bottom edge of the cake to protect the cake round.
    • Pour a little ganache on to the top of the cake, just to create a thin smooth layer to cover any crumbs. Use a spatula to help smooth out if necessary. Let cool for a couple minutes to set.
    • Make sure the remaining ganache is nice and smooth, but viscous (this will make sure it creates a thick layer), reheating over the saucepan if necessary.
    • Pour remaining ganache onto the cake slowly, positioned right above the middle. Let the ganache drip over the edges.
    • Go back and smooth out the edges so that the sides are frosted. Don't touch the top as this should be smooth!
    • Next time, I plan to add chocolate sprinkles on the sides of the cake too.
Coconut Filling Recipe (Nuts Optional)
About 3 1/4 cups
  • Group A
    • 1 cup sugar
    • 1 cup evaporated milk (you can also use heavy cream)
    • 3 large egg yolks, beaten together
    • 1/2 cup (1 stick) unsalted butter, cut into small pieces
    • 1/8 tsp salt
    • 1/2 tsp vanilla
       
  • Group B
    • 1 2/3 cups flaked sweetened coconut (I use Baker's Angel Flake)
    • OPTIONAL: 1 1/3 cups chopped pecans (Reduce coconut by 1/3 cup if you choose to use nuts)
  1. GROUP A: MAKING THE BASE
    • Combine all Group A ingredients in medium saucepan
    • Cook mixture over heat, stirring constantly until mixture is thickened and bubbling gently on the edges.
    • Reduce the heat to low and cook/stir for another 2 minutes
    • Remove from heat.
       
  2. FINISHING THE FILLING
    • Stir in coconut (and pecans if you prefer)
    • Let cool until spreadable.
Chocolate Ganache Recipe
Frosts 9-inch cake.
  • 7 oz chopped bittersweet or dark chocolate
  • 7 oz heavy cream
  • 1 tbsp unsalted butter (this helps the ganache maintain a shiny appearance)
  1. Place chopped chocolate in heatproof bowl
  2. Heat heavy cream and butter in a saucepan until just boiling.
  3. Remove cream mixture from heat and pour immediately over chopped chocolate.
  4. Whisk until ganache is smooth.
  5. Let rest for a few minutes before starting to frost cake.