September 8, 2012

The Salt Lick for "Bottomless" Brisket BBQ and More!


The Salt Lick is one of the best barbecue places to visit if you're near Austin, TX. It's located in Driftwood, TX which is about a 35 minutes outside of Austin, but between the amazing bbq and experience - it's worth the drive. They are always busy though, so my reco would be to go at an off hour. We went at around 4:30PM on a Sunday afternoon, and were seated right away. During normal meal hours, the waits can easily get up to over an hour.

If it's your first time, I strongly recommend ordering the all you can eat "Family Style" option for $19.95 as this is the best way to get to try the different meat options: beef brisket (lean, moist, burnt ends), sausage, and pork ribs. It also comes with potato salad, cole slaw, baked beans, pickles, white bread, and optional jalapenos (careful - these are really spicy!). Don't discount the white bread - it's probably the softest, tenderest white, sandwich bread I've ever had. A hint of sweetness with texture that's probably most similar to Hawaiian bread. Add some whipped spread and enjoy :)

Get everything for your first plate just to see what you like. I normally like either lean or burnt ends, but found out after trying the options that "moist" for the brisket was my favorite. You get enough of the "char" and a little bit of crispy on the edges, without it being too tough (which the burnt ends ended up being). The moist beef brisket is so, so tasty! My 2nd favorite is the sausage, and last - the pork ribs. I've definitely had better pork ribs (I really like Texas Roadhouse), but the beef brisket and sausage are amazing. 

All the barbecue has 'sauce' already, but you can add more. They have their original and spicy available at the tables. While they call the spicy "Habanero", it really is not very spicy at all. I liked the original and don't think the extra spice added anything unique. The sauce here isn't tomato based and tastes really unique from other bbq sauces I've had. It's very yummy though and you can buy bottles of it to bring home.

The potato salad and cole slaw (neither of which have mayonnaise based sauces which I appreciate) both have a light vinegar taste. Along with the pickles, these work great with the bbq as it helps cut through the grease. They may not be the most attractive sides, but they are simple and good. I'm not a huge baked beans fan - but they're worth trying.

Last, I've heard their desserts - cobblers and pies - are delicious, but I had too much meat in my belly :( Maybe next time. I haven't tried the turkey either so I just might do that. Mmmm….can't wait till I get more brisket. The Salt Lick is worth visiting again and again, but I may have to sacrifice a visit the next time I'm in Austin to try 

Tips: The Salt Lick is BYOB and if you're really craving a fix, they do have a location at the airport. It's not as good - but it does the trick to get your last bite of barbecue in!

See more pictures here: http://on.fb.me/PcCICN

The BBQ Pit, A Smorgasbord!
The barbeque pit at the Salt Lick: sausage, turkey, brisket, ribs, and more
All You Can Eat "Family Style" - $19.95
Salt Lick Family Style Food
"Family Style": endless sausage, ribs, brisket, potatoes, cole slaw, beans, bread and pickles


August 6, 2012

Low (er) Fat, Tender Buttermilk Biscuits Recipe

I won't pretend that these biscuits are without fat, but given that they are made with 1% buttermilk, it makes me feel better that they are "low fat" biscuits :) More importantly, others won't be able to tell that they are "healthier", and an added bonus is that they are very easy to make! 

Adapted primarily from a highly rated Cooking Light biscuit recipe, I added additional best practices from other biscuit experts that I incorporated. I learned that making good biscuits is all in the handling of the dough, so hopefully these tips will help you avoid dry and crumbly biscuits.

Tip: While these are very easy to consume, I highly recommend eating these in moderation as your belly will get full from them! My friends and I love these and hope you do too :)

Lowfat Buttermilk Biscuits Recipe
Makes approximately 12 2-inch biscuits
(recipe easily doubles to make ~12 3.5" biscuits)

  • 9 oz all-purpose flour (I highly recommend weighing this as extra flour makes for dry biscuits!)
  • 2 1/2 tsp baking powder
  • 1/2 tsp salt
  • 3 tbsp chilled butter, cut into small pieces
  • 2 tbsp chilled shortening, cut into small pieces (I use Crisco)
  • 3/4 cup 1% buttermilk (make sure you shake before measuring)
  • 3 tbsp honey
PREPARATION
  1. Preheat oven to 400 degrees (425 if you are making 3.5" biscuits)
  2. Prepare butter & shortening into small pieces and refrigerate to ensure they are chilled.  (Note: you can use all butter or all shortening but I like the combination of both. The shortening creates a flakier biscuit)
  3. Combine flour, baking powder, and salt in a large bowl.
MIXING
  1. Cut in butter & shortening until mixture resembles coarse meal. It's ok if there are a little pebbles of fat left. Chill for at least 10 minutes.
  2. Whisk buttermilk and honey until well blended (Note: I do this in a 2-cup Pyrex so it's easy to measure and pour), then place in the fridge to chill as well.
  3. After ingredients are chilled, create a crater in the middle of the flour mixture and pour the liquid mixture all at once into the crater.
  4. Use a fork to mix everything together as quickly as possible, starting from the center and bringing flour in, until just moist. It's ok if there's a little flour left, but you don't want a lot.
FOLDING & CUTTING
  1. The next few steps are critical. Do not overwork the dough or else you'll get less tender biscuits. I also think this folding method from Cooking Light is the easiest to follow.
  2. Turn dough out onto a lightly floured surface and knead a few times to make sure any extra flour is incorporated.
  3. Pat dough with your fingertips into a 1/2" thick 9x5" rectangle (18x10" if you're making larger biscuits). Dust surface lightly with flour.
  4. Fold dough into thirds, as if folding a piece of paper to fit an envelope.
  5. Pat dough again into 1/2" thick 9x5" rectangle (18x10" for larger biscuits). Dust surface lightly with flour.
  6. Fold dough into thirds.
  7. Pat dough to a 3/4" thickness into a shape where you can maximize the number of biscuits, depending on your biscuit cutter size. 
  8. Cut dough with your preferred biscuit cutter. Make sure to press straight down, and do NOT twist the cutter. You can also cut your dough into squares if you prefer.
BAKING
  1. Place dough rounds on a parchment lined baking sheet with the edges just touching. This helps the biscuits to rise and also helps them to stay more tender. (Note: you can reshape the scraps and bake, but these won't be as tender)
  2. Bake for approximately 12 minutes on the top oven rack. For larger biscuits, rotate pan about halfway through. The biscuits should be cooked after ~12 minutes, but check a scrap to be sure. If the biscuits are cooked inside but not quite golden on top yet, use the broiler for 1-2 minutes (while watching carefully!) to create the color.
  3. Remove from pan and cool 2 minutes on wire racks before serving.
These biscuits are really best on the same day, but are still pretty tasty the next if you store them in a ziplock bag. I have also freezed them after bake for future consumption. Enjoy alone, with jam, or get creative! I served these with a homemade Korean-inspired fried chicken slider.

Homemade Lowfat Buttermilk Biscuits
Homemade Biscuits
Lowfat Buttermilk Biscuits: all-purpose flour, 1% buttermilk, butter, crisco, baking powder, salt, honey

East Meets West Fried Chicken Slider on a Biscuit
East Meets West Fried Chicken Slider: fried chicken, homemade Korean inspired  bbq sauce, homemade pickles & fresh lettuce on a biscuit


July 15, 2012

Dim Sum in SF Bay Area: Koi Palace, Daly City

om nom notes rating: 4 stars

Dim Sum on the weekends can hit the spot - but only if you're mentally prepared for the wait (easily 30-90 min) and ok service. Koi Palace at the Daly City is a good option in the Bay Area, but it is a little more pricey and there will always be a wait. They do have the traditional dim sum carts, but that's also supplemented by a menu where you can order off on for any particular dishes you may want to try - without constantly having to "check" if the next server has it in her cart.

Koi Palace has an extensive menu, and they do use quality ingredients generously (eg the har gow with a lot of plump shrimp). As long as you expect the wait and know that you're not going for the service (despite the price), you'll enjoy the food and experience. Note: in comparison to other dim sum locations, the service here is actually quite good!

Tips for Dim Sum at Koi Palace:
  1. Get there early - your wait will be much less the closer you arrive to their opening time for dim sum on the weekend, 10am on Saturdays and 9am on Sundays. Get your number and wait outside where it's quieter - they have a speaker outside so you can hear your number. Koi has a clever "number tracking" screen where you can see exactly how many tables are in front of you, sorted by table size. They even have an SMS update notification you can sign up for. Note: While you can *try* making a reservation, you will most likely still have to wait.

    Dim Sum Hours: Sat 10-3, Sun 9-3 (or weekdays from 11-2:30)

  2. Because you're waiting - you might as well try out the Dragon's Beard Candy, a hard to find, traditional Chinese confection. The skill to make this sweet treat is very rare so take advantage of the opportunity! I literally haven't had this in over 10+ years and am so glad Koi Palace always has it. See it made: http://on.fb.me/N9JN7A

  3. Order the roasted suckling pig slices - this is one of the "special" items off the menu. It's a little pricey at $18 an order but it's worth it. Get it if you love crispy pork skin and tender, juicy pork. You'll want to order this from the servers as it often does not show up in the carts.

  4. Baked egg custard buns take 45 min to prepare - so order these from the servers as soon as you sit down in case they have run out of a batch. These are usually my favorite, but I unfortunately did not get to try them as I wasted all my time waiting for these to appear in the carts :(

  5. Use the carts & order off the menu - i hate it when dim sum places only have the "order off the menu" option as it no longer feels like dim sum any longer. Koi has a nice variety of options from the carts, but because of how busy the place is - sometimes there are selections that never come by you. This is where the menu comes in handy.
    You can easily flag down a server to order any specific dishes that you don't want to miss, and they'll bring it back to you. This way, you get the experience & ensure you don't miss out!

  6. Don't forget to order tea - It's not dim sum unless you have tea. My favorites are either Puerh or Chrysanthemum to go with dim sum. Oolong (which I normally love) in my opinion gets a little overpowering.
See more pictures @ http://on.fb.me/Nrbl3S

Hand Roasted Suckling Pig Slices - $18
Order the Suckling Pig for $18 - it's worth it.
Roasted Suckling Pig Slices: the skin is so crispy but the inside stays nice and moist
Fresh Dragon's Beard Candy - $9 for 8 pieces
Assembling Dragon's Beard Candy with the Original filling
Dragon's Beard Candy: a traditional chinese confection made from spun sugar, and filled with toasted peanut, coconut, and sesame. Koi Palace has someone to make it fresh, don't miss out - it's hard to find!
3.5 star rating
1564 Yelp reviews as of 7/15/12

(650) 992-9000


July 13, 2012

A Must Try Food Truck: Turf N Surf Po' Boy in Austin


om nom notes rating: 5 stars

This food truck served what ended up being my favorite meal in Austin, TX this last trip. In a sea of food trucks - Turf N Surf Po' Boy stands out from the rest because of it's unique local, fresh food menu and intentionally dilapidated but charming "truck". They had quite the selection of responsibly sourced seafood, beef, pork and veggies - but po' boys are truly the star. This truck is not to be missed.

I have to add that the folks here are the NICEST people. They took the time to recommend selections, and made it a point to tell me that I could order anything exactly the way I wanted. So of course I did. :) They were also very apologetic when they didn't have some menu items like the guacamole or etouffee.

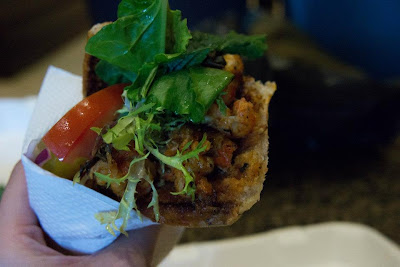
While their blackened or fried shrimp po boys are the crowd favorite, I chose to do the grilled crawfish po-boy with extra tomatoes and coleslaw on the side. 

It was AMAZING. Between the crusty and just right grilled multi-grain bread (different from your standard french-style baguette), the seasoned just right crawfish, the fresh tomatoes & mesclun greens, and the addition of thick sliced pickles - every bite's mingle of flavors made me so happy. 

While you would think might be a heavy, greasy sandwich - the greens, pickles, and squeeze of line added the unexpected freshness that made this monstrosity of a sandwich seem almost delicate. It was so good that I must have eaten the entire thing in 5 minutes. The coleslaw is very creamy (courtesy of Mr. Mayo), so I'm glad I got it on the side. 

You can also get any of the Po' Boys in the form of 2 tacos, or a salad (but really - who would want to do that?). I got to try a bit of the blackened shrimp taco, but I have to say that the po-boy with the amazing bread is better and significantly more memorable. Blackened shrimp was very good though.

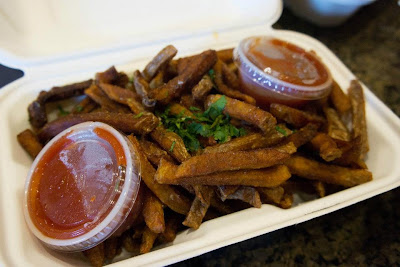
The cilantro fries on their own are worth getting, just note that it's a huge portion and enough to share between at least 4 people. Curiously enough, they reminded me of the fries from "The O" (The Original Hot Dog Shop) in Pittsburgh - about a medium cut, but fried till crispy.  I had heard that you can get etouffee fries, but sadly they were out of gravy. Next time…

See more pictures at: http://on.fb.me/NIkzeh

Quick Notes:
  1. Love that the truck/trailer was built out of 90% recycled/reclaimed material - it started as a shipping container!
  2. There is a shaded seating area, but it's open so still hot!
  3. They take credit cards.
  4. Learn more about the history of the po' boy.
  5. They sometimes are open outside of their normal hours, just check their Facebook page for updates
    • Normal Hours:
      Mon-Thu 11 am - 3 pm
      Fri 11 am - 3 am
      Sat 12 pm - 3 am
Grilled Crawfish Po' Boy - $10
Grilled Crawfish Sandwich from Turf N Surf
Grilled Crawfish Po' Boy: grilled crawfish, mesclun greens, pickles, red onion, tomatoes, and coleslaw (on the side)


Cilantro Fries - $3
Potato Fries Large Enough to Share
Cilantro Fries: fresh cut potatoes, salt, cilantro, ketchup


Turf N Surf Po' Boy Trailer Truck
People waiting in line for food from Turf N Surf
Turf N Surf Po Boy Food Truck: at 4th and Congress
Turf N' Surf Po Boy
4.5 star rating
177 Yelp reviews as of 7/13/12

July 5, 2012

Bagels that are Worth the Calories

om nom notes rating: 5 stars


Ever since I found out that bagels are easily 300-400 calories for a bagel itself, I generally stopped eating bagels. However, I recently discovered House of Bagels in San Carlos. These traditional New York style bagels are amazing and I have to use my utmost control to limit my intake to only 1 bagel per week. These bagels are worth it.


House of Bagels is a franchise in the SF Bay area, but every store controls their own menu. What is consistent is how they make their bagels. Made fresh daily, HOB bagels are boiled first, and then baked on brick. This creates the soft, moist but chewy interior, and a tougher, flavorful crust exterior - just the way a bagel should be. The right texture for both the inside and outside of these bagels is what makes the difference. Note: these bagels aren't as large as Panera or Noah's/Einstein Bro's, but more than make up for it in taste and quality.


While I can easily eat any of these bagels on their own, they taste even better with HOB's large selection of schmears (in between normal and whipped and usually available in lite) or bagel sandwiches (available with your preferred bagel). My favorite bagel go-tos are either egg or jalapeno which I get with lite cream cheese on the side. Or, if I'm feeling particularly indulgent, I go for the "Hamlet" bagel omelet (#3) on jalapeno. Ham, fluffy egg, and american cheese on a bagel with a little bit of kick, it's the best way to start a weekend.


This family owned franchise store cranks out an amazing number of orders every day (including perfecting a method to cook the egg exactly as needed for the bagel breakfast sandwiches!). They're incredibly efficient to help meet the needs of the customers who just want to stop in, pick up, and get on with their day. Don't take this efficiency as poor service please. They work hard and are totally pleasant if you are!


Tip: They only make specific quantities of bagels each day and will close early (before 2pm) if they totally run out! I usually go around 10am on a weekend and have all my choices still. 


See more pictures at http://on.fb.me/PlX3r5


Hamlet Bagel Omelet - $3.85
Hamlet Bagel Sandwich from House of Bagels
Hamlet: jalapeno bagel, ham, egg & cheese
Bagel Varieties - $0.95/each or $9.25/dozen, Premium $1.10/each
Bagels & Premium Bagels from House of Bagels
Bagels: chocolate chip, cranberry, cinnamon raisin, blueberry, garlic, egg, jalapeno, sourdough, pumpernickel, whole wheat, sun dried tomato, salt, rye, onion, all in one, poppy, sesame, plain
Premium Bagels: cinnamon sugar, cheddar & jack cheese, jalapeno cheddar & jack, asiago


House of Bagels - San Carlos

4.5 star rating
60 yelp reviews as of 7/5/12


http://

July 4, 2012

German Chocolate Cake Without Nuts and Ganache Frosting

This is how I like my German Chocolate Cake - no nuts, and frosted with chocolate ganache.  After doing some research, this recipe is mostly based on the version from Joy of Cooking, but with my own little tweaks. Of course, if you like nuts in your german chocolate cake - you can definitely add the pecans back in! 

I also learned that German Chocolate Cake isn't technically from the Germans, it was just a type of sweet chocolate invented by a man named German. :) I think the cake is sweet enough though so my choice was to use dark chocolate (about 58% cacao) instead. Trader Joe's sells their Pound Plus (17.6 oz) Belgian baking chocolate for $4.99 and it works great!

This recipe may look long, but it's worth it! I tried to break out the steps as much as possible for this one :) I hope you enjoy!
No Nut German Chocolate Cake with Coconut Filling
German Chocolate Cake: dark chocolate, butter, cake flour, sugar, eggs, vanilla, buttermilk, salt, coffee, evaporated milk, sweetened coconut, heavy cream, baking soda
German Chocolate Cake Recipe
2 9-inch round layers
  • Group A
    • 2 1/4 cups sifted cake flour (make sure you measure after you sift)
    • 1 tsp baking soda
    • 1/2 tsp salt
  • Group B
    • 4 oz dark baking chocolate, finely chopped
    • 1/2 cup warm coffee (I use strong french-pressed coffee)
    • 1 tsp vanilla
  • Group C
    • 1 cup buttermilk (I used reduced-fat buttermilk and think it's just as good, but you can use regular)
    • 1 cup (2 sticks) unsalted butter (I start with cold butter from the fridge)
    • 1 3/4 cups (350 grams) sugar 
    • 4 large egg yolks (save the egg whites, you'll use them later)
  • Group D
    • 4 large egg whites
    • 1/4 tsp cream of tartar
    • 1/4 cup (50 grams) sugar
  1. PREPARATION
    • Preheat the oven to 355, you'll reduce this to 350 to bake at as soon as you put the pans in. The extra 5 degrees helps to ensure your cake starts baking from the start at 350.
    • Have all the ingredients at room temperature, with the exception of butter if you're using a stand mixer. I've found that this helps to ensure the butter doesn't break.
    • Grease and flour 2 9x2inch round cake pans, or line the bottoms with parchment paper. I don't recommend lining the sides with parchment as these can cause the cake to bake unevenly.
    • If you use parchment, save the scraps to use while frosting later.
       
  2. GROUP A: DRY INGREDIENTS
    • Whisk together sifted cake flour, baking soda and salt until thoroughly blended
       
  3. GROUP B: MELTING THE CHOCOLATE
    • Bring a small saucepan of water to a simmer.
    • Combine chopped chocolate and coffee in a heatproof bowl that will fit on top of your saucepan.
    • Place the bowl on the saucepan and stir until the chocolate is melted and smooth.
    • Stir in vanilla
    • Remove bowl from saucepan and set aside
       
  4. GROUP C: MAKING THE BATTER
    • Have buttermilk measured and ready to go on the side
    • Cut cold butter into 1 inch chunks.
    • Using a stand mixer with a flat beater, beat butter until creamy and pale.
    • On high speed, gradually add 1 3/4 cup sugar (about 1/4 cup at a time) and beat until light and fluffy.
    • Beat in 1 egg yolk at a time until all 4 are incorporated.
    • On low speed, add in the melted chocolate mixture and beat until just incorporated.
    • Add flour mixture in 3 parts, alternating with the buttermilk in 2 parts
    • Beat until smooth and make sure to scrape the sides down as appropriate.
    • Transfer all of the mixture into a large, wide bowl. You'll use this to fold the meringue in later.
       
  5. GROUP D: MERINGUE
    • Use a clean mixer bowl with a flat beater, beat egg whites and cream of tartar on medium speed until soft peaks form.
    • Gradually add 1/4 cup sugar and beat on high speed.
    • Beat until peaks are stiff but not dry.
       
  6. C+D: FINISHING THE BATTER
    • Use a rubber spatula to fold in 1/4 of the meringue into the chocolate batter mix.
    • Fold in remaining meringue.
       
  7. BAKING
    • Divide batter among pans and spread evenly across the tops. I generally measure both pans on a scale to ensure they are equal.
    • Bake until toothpick inserted into the center comes out clean, about 25-30 minutes
    • Let cool in pan for at least 10 minutes before removing from pan.
       
  8. COOLING
    • Lightly spray cooling rack with baking spray.
    • Run a thin knife around edge of pan, invert on to a cooling rack, peel off parchment paper, and turn the cake right side up to cool.
    • Wait till cakes completely cool before frosting.
       
  9. ASSEMBLING THE CAKE
    • Start this process only after cakes and filling have cooled.
    • Cut each cake into 2 halves, using a rimless baking sheet or flexible cutting board (reserved for baking only) to help remove the layers.
    • Split filling into 3 batches (I measure this on a scale to make sure it's even)
    • Starting with the 1st layer on a 10 inch cake round, use the 1st batch of filling and spread evenly across the cake. Leave about a 1/3 inch edge as the filling will push out when you add on the additional layers. 
    • Repeat with next 2 layers of cake. Place the 4th cake layer on top.
    • Trim the edge of the cake with any uneven edges. Doesn't have to be perfect as the edges will get covered with ganache later.
       
  10. FROSTING THE CAKE
    • Place your parchment pieces around the bottom edge of the cake to protect the cake round.
    • Pour a little ganache on to the top of the cake, just to create a thin smooth layer to cover any crumbs. Use a spatula to help smooth out if necessary. Let cool for a couple minutes to set.
    • Make sure the remaining ganache is nice and smooth, but viscous (this will make sure it creates a thick layer), reheating over the saucepan if necessary.
    • Pour remaining ganache onto the cake slowly, positioned right above the middle. Let the ganache drip over the edges.
    • Go back and smooth out the edges so that the sides are frosted. Don't touch the top as this should be smooth!
    • Next time, I plan to add chocolate sprinkles on the sides of the cake too.
Coconut Filling Recipe (Nuts Optional)
About 3 1/4 cups
  • Group A
    • 1 cup sugar
    • 1 cup evaporated milk (you can also use heavy cream)
    • 3 large egg yolks, beaten together
    • 1/2 cup (1 stick) unsalted butter, cut into small pieces
    • 1/8 tsp salt
    • 1/2 tsp vanilla
       
  • Group B
    • 1 2/3 cups flaked sweetened coconut (I use Baker's Angel Flake)
    • OPTIONAL: 1 1/3 cups chopped pecans (Reduce coconut by 1/3 cup if you choose to use nuts)
  1. GROUP A: MAKING THE BASE
    • Combine all Group A ingredients in medium saucepan
    • Cook mixture over heat, stirring constantly until mixture is thickened and bubbling gently on the edges.
    • Reduce the heat to low and cook/stir for another 2 minutes
    • Remove from heat.
       
  2. FINISHING THE FILLING
    • Stir in coconut (and pecans if you prefer)
    • Let cool until spreadable.
Chocolate Ganache Recipe
Frosts 9-inch cake.
  • 7 oz chopped bittersweet or dark chocolate
  • 7 oz heavy cream
  • 1 tbsp unsalted butter (this helps the ganache maintain a shiny appearance)
  1. Place chopped chocolate in heatproof bowl
  2. Heat heavy cream and butter in a saucepan until just boiling.
  3. Remove cream mixture from heat and pour immediately over chopped chocolate.
  4. Whisk until ganache is smooth.
  5. Let rest for a few minutes before starting to frost cake.

June 22, 2012

Affogato - An Italian Coffee Ice Cream Float

What's a double shot of affogato with stracciatella? Only the perfect treat on a sunny breezy day! An affogato is an Italian coffee beverage traditionally served as a scoop of vanilla gelato with a shot of hot espresso poured over, and served with a spoon.


I like getting mine with stracciatella flavored gelato though as this is essentially Italian vanilla chocolate chip. The chocolate chip bits add an additional dimension of texture to this luscious, creamy afternoon treat. Two shots of espresso also help to offset the sweetness if you like more coffee flavor. 


Affogatos are usually available at italian coffee shops, cafes, or restaurants - but most importantly, where there is a good espresso machine. Sometimes, affogatos are served with a shot of liqueur such as amaretto (almond) or frangelico (hazelnut). Since I usually get mine on the go, I am plenty happy with just the gelato and espresso - but make sure you get it from a place that makes good espresso! I also think whipped cream is unnecessary. Gelato makes it rich enough.


Now that I'm thinking about affogatos, I think they're a perfect treat any day!


Affogato with Stracciatella Gelato - $6.75
Italian Coffee Ice Cream Float
Affogato: 2 shots espresso, Italian vanilla chocolate chip gelato
Assorted Italian Pastries
Italian Baked Goods
Croissants, Bastone, Sfoglia di Amarena, Kipfen, Cannella, etc.


June 19, 2012

Farmer's Market Produce with a Noticeable Taste Difference

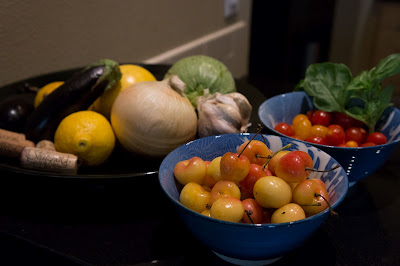
I love going to Farmer's Markets and do notice a difference in some produce items. Not all of them - but the below are some fruits and vegetables that I refuse to buy from a grocery anymore. I'm sure this list will grow as I continue to get spoiled by fresh, local california produce!


  • White Peaches: The flavor, juiciness, and sweetness of the white peaches are out of this world. So many varieties too where you can really taste the difference. Most regular ones are ~ $2.00/lb. The Yen-Yen White Donut Peach ($3.50/lb) is one of my favorites.
  • White Nectarines: Similar to peaches above, so tasty! The Polar Light Nectarine is out of this world sweet - $3.50/lb
  • Cherries: Especially the Rainier Cherries. Even the little ones are plump and super flavorful - $5.00/basket
  • Tomatoes: You'll never want to eat grocery bought tomatoes again! Cherry, orange, yellow, hybrids, etc. So many different types, all delicious with varying degrees of tomato flavor vs. sweetness. ~$4.00/lb
  • Elephant Garlic: It costs more, but each clove is huge and packed with flavor ~$2.00/head of garlic
  • Summer Zucchini & Squash: I learn about a new type of zucchini or squash every time I go to the market! Roly Poly, Squash Blossom, Turban etc. Very low maintenance - just brush with olive oil, season with salt and pepper and throw it on the grill.
Fresh, Local Produce
lemons, eggplant, cherries, tomatoes
Farmer's Market: eggplant, lemons, onion, elephant garlic, roly poly zuchhini, tomatoes and rainier cherries
Grilled Vegetables
Farmer's Market Produce
Grilled Summer Vegetables: eggplant, zucchini, squash, tomatoes, onions drizzled with a balsamic, parsley, basil and rosemary vinagrette.

June 15, 2012

What is a Kouign Amman?

om nom notes rating: 5 stars


It's only the best baked good ever! It's travesty that I have not had this delectable Breton, French pastry until this most recent trip to New York. Why don't they have more places that make this in California, especially in the Bay Area!


In short, a Kouign Amman is a baked specialty by the Bretons from Brittany, France. In Breton, the traditional language spoken in Brittany, Kouign means "cake" and Amman means "butter" (pronunciation: koo-ween ah-mon). 


The result? A "butter cake" that's flaky, buttery with a little salty goodness and a crunchy caramelized crust  all in one delicious treat. Literally, the kouign-amman is made by folding together layers of salted butter, sugar, and bread dough. It's almost like a croissant, puff pastry, and a palmier all in one - and it certainly is at the top of my list. It even beats the amazing Williams-Sonoma Croissants. That's saying a lot.


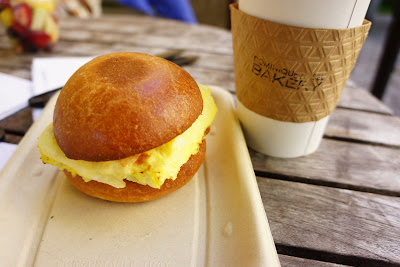
There are several places in New York that carry Kouign Ammans, but it is a signature at the Dominique Ansel Bakery in the South Village lovingly named the DKA ("Dominique's Kouign Amman"). The DKA along with the Perfect Little Egg Sandwich, complete with a garden sitting area made for a delightful breakfast visit. The only issue was that I really wanted to try everything on the menu, I must go back.


Yes the price was a bit steep, but these little treats take a lot of effort to make. Kudos to David Lebovitz and The Purple Foodie for taking that challenge on! As for me, I'll need to start the search for these around San Francisco - even if that means trekking all the way over to the Starter Bakery in Oakland, CA. 


I promise I'll come by to your store often if anyone starts selling these on the Peninsula :)


DKA - $5.25
Dominique's Kouign-Amman
Dominique's Kouign Amman: butter, salt, sugar, and flour

Caramelized on the outside, soft and flaky within
DKAs: a whole basket of them!
 Perfect Little Egg Sandwich - $5.00
Breakfast Sandwich in Soho
Perfect Little Egg Sandwich: egg, herbs, butter, on a brioche bun
Dominique Ansel Bakery

4.5 star rating
71 Yelp reviews as of 6/15/12

(212) 219-2773


June 9, 2012

The Ambiguous "Onion Soup" IS French Onion Soup

om nom notes rating for onion soup: 5 stars


So Blue Ribbon Brasserie's dishes to fame are seemingly the Beef Marrow & Oxtail Marmalade and Fried Chicken, but sadly I did not have a chance to try these out. I'm sure it's delicious though and you can read all about it on Yelp. Next time...


That being said, I did want to share is that the ambiguous sounding "onion soup" on the menu is in fact French Onion soup, complete with lots of crusty but melty cheese with toasty bread edges. The price is a bit steep, but I've heard that it's one of the best french onion soups in New York City - and it's certainly shareable. Don't ignore it (which is what I did while reading the menu)


I love crispy bits so appreciated the large shallow bowl it came in to maximize the crunch and ooze:) 


Tips: I've heard from NY natives that this place is a great place for celeb sightings and the mustard here is great! Used it with my Ham & Cheese Sandwich (Cotta de Parma & Swiss).


Onion Soup - $14.50
Blue Ribbon Brasserie Onion Soup
Blue Ribbon Brasserie

4.5 star rating
412 Yelp reviews as of 6/9/12


June 8, 2012

NY Chicken and Rice (+Lamb) - Different But DELICIOUS

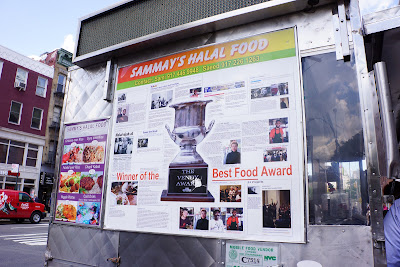
om nom notes rating for Sammy's Halal Cart: 5 stars


If you've never had chicken and rice from a food cart/stall/truck/stand in New York, you are missing out. While Sammy's Halal is not the same as the famed chicken and rice from The Halal Guys at 53rd and 6th, it IS OM NOM NOM AMAZING and a much closer option if you're in the SoHo/Lower West Side area. It is different though and there's almost more of an Indian twist to these platters. Treat it as such and you won't be disappointed.


Biggest differences between Sammy's and The Halal Guys are noted below:

  • $5 for an order vs. $6 (53rd and 6th) - It is a touch smaller of an order
  • Rice is brown vs yellow and has a stronger cinnamon flavor vs. turmeric, plus it seems to be of a longer grain
  • Chicken is cooked with onions and peppers and is less 'shredded'
  • Lamb is more like cubed gyro meat - Note: I do like the Halal Guy's lamb better as it has more crispy bits
  • You can add chickpeas at no extra cost - these are a little bit spicy and very well spiced.
  • In addition to white sauce and red sauce, there is a green sauce available
  • There is only 1 Sammy's cart
If you've never had chicken and rice from a food stand, you must do so immediately even if it's from a random stand - it is always delicious. Sammy's and The Halal Guys at 53rd and 6th just bring it to the next level. 

Chicken + Lamb and Rice Combo - $5.00

Chicken and Rice from Sammy's Halal
Chicken + Lamb (Gyro) and Rice Combo: chicken, lamb cubes, rice, lettuce, white sauce, red sauce (harissa based), green sauce (cilantro based), and chickpeas

Chicken and Rice Food Stand in New York
Sammy's Halal Food Truck: on the NE corner of 6th avenue and W. 4th street on the west side of Washington Square Park. get off at the christopher st. - sheridan sq stop if you're taking the 1 train, or at the W. 4th street stop if you're taking the A, B, D, E, F, or M trains. It is right in front of the Chase Bank at 340 6th avenue, New York NY.

Chicken Platter $5.00, Gyro Platter $5.00
Sammy's Halal Menu: chickpeas and green sauce can be added at no extra charge if you ask for them. note - they only charged me $5 for a platter when i asked for half chicken/half gyro.

4.0 star rating
52 Yelp reviews as of 5/8/12